by Jessica Zhang
Fun Rating: 5/5

Difficulty Rating: 4/5

What is the general purpose?
Confocal microscopy is used to capture incredibly sharp, high-resolution images of a single, thin slice within a sample, such as a section of tissue or a layer of cells.
Why do we use it?
We use confocal microscopy to magnify tiny structures, just like regular microscopes, but it has a key advantage: it is cleverly designed to capture only in-focus light from a specific plane. This allows us to see fine details deep inside the sample that would otherwise be obscured. It also allows us to reconstruct a detailed 3D model by capturing a stack of these sharp images at different depths.
How does it work?
Regular microscopes encounter a major problem when looking at samples with thickness – they capture a lot of out-of-focus light from layers above and below the target, which makes the final image blurry and hazy. Confocal microscopes are designed to solve this by focusing on just one tiny spot at a time and rejecting all the blurry light from other layers.
Images from confocal microscopy are built in three main steps:
- Laser scanning – Instead of lighting up the whole sample at once, a laser is used to light up one single point within the chosen focal plane. To build a full picture, the laser beam scans across the sample point-by-point and line-by-line, almost like how your eyes scan words on a page to read a sentence and eventually a paragraph.
- Light filtering with a pinhole – The light shining back from the sample must pass through a tiny hole, called a pinhole, before it reaches the detector. (See figure)
- Light coming from the exact focal point (the “in-focus” light) is perfectly aligned and passes straight through the pinhole.
- All the blurry light from other layers comes in at a slight angle, misses the pinhole, and is physically blocked.
- Image building – A computer records the brightness of each point as the laser scans. It then stitches all these sharp, blur-free pixels together to construct one complete, 2D image of that single slice. To get a 3D view, the microscope simply moves its focus up or down, scans a whole new slice, and repeats the process to create a “stack” of images.
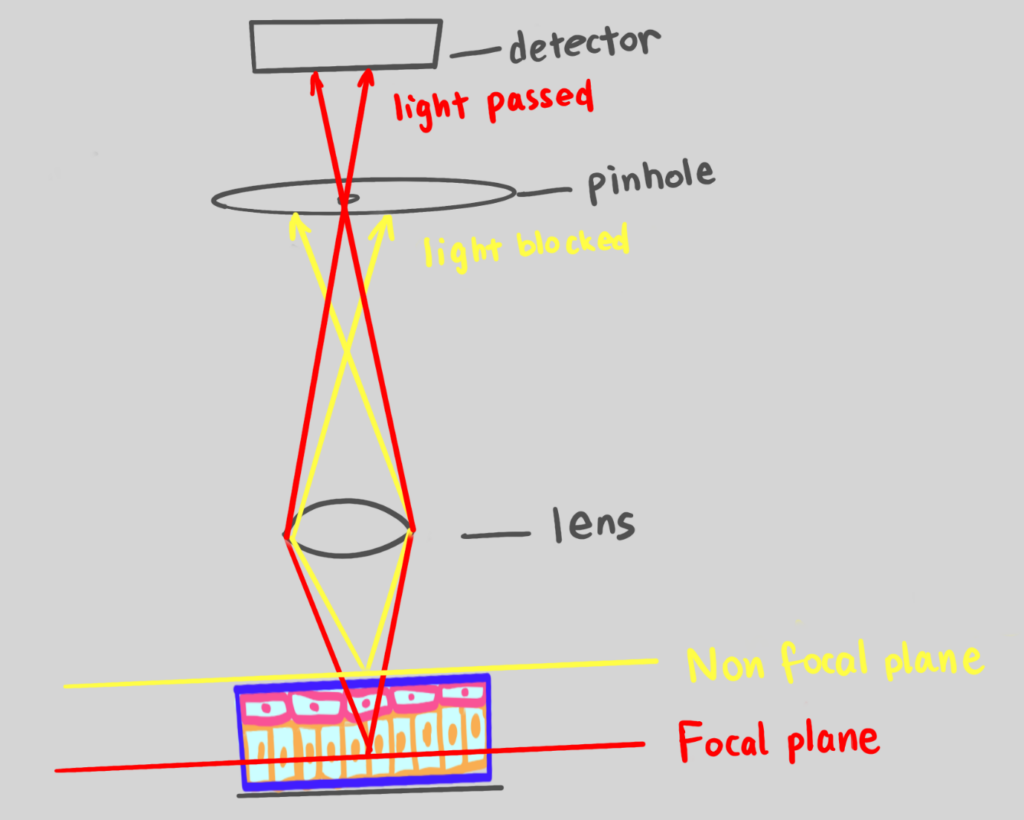
Figure 1: Image demonstrating confocal microscopy, utilizing a pinhole to capture an in-focus image. Image generated by author.
What can we see with it?
With the exceptional ability to create blur-free images, confocal microscopy can be used in many different ways:
- Visualizing 3D structures: As discussed above, stacks of 2D images can reconstruct the whole 3D picture. For example, scientists can use it to map the intricate, branching “wires” of a nerve cell in neuronal tracing. This is typically done on a preserved sample, where the microscope can take its time to capture a high-resolution stack of images.
- Record videos of live cells: The microscope can also be set to scan very quickly, allowing it to capture “frames” in real-time. This allows scientists to record videos of living cells to watch biological processes as they happen. For example, they can watch a cell move, see it divide into two new cells, or observe how it responds instantly when certain molecules are added to its environment.
- See molecular interactions: The microscope’s clarity also allows us to see if different molecules are in the same place at the same time. To do this, scientists tag different molecules with different colored fluorophores. Imagine one molecule is tagged with a green fluorophore, and another tagged with a red fluorophore. If the two molecules physically interact, then red and green will mix to give a yellow spot in the image. This colocalization could be a piece of evidence to suggest that these two molecules interact physically.
